
I am limited for actual garden space at the Homestead, short of renting a large-scale construction excavator to clear trees and shrubs for a new garden area, the next best thing to do was to build a raised garden bed. Way cheaper too as I hear those big machines rent for around $500/hr.
Instead, for the price of lumber and materials, sweat (hubby’s) and fair number of cases of beer (again…for hubby) I now have a raised garden bed made out of cedar that it is perched atop the Great Canadian Shield like a monument to Mother Nature. She is a thing of beauty…and did I mention that hubby built it? With his very own hands? No really, he did and I can’t thank him enough…he even said so. I really did marry a great guy, no one else would do this stuff for me….
So now that I have this gorgeous planter bed built, we lined it with landscape fabric and filled it with dirt (another labour of love from hubby, lots and lots of wheelbarrow runs to fill it), then…as much as you would like to jump in with your seeds and seedlings – WAIT, don’t plant anything yet until a protective cover is devised for it. Otherwise the hungry cloven-hoofed herbivores of the neighbourhood will be lined up like a Timmie’s drive thru ordering their versions of a double-double.
Off to big box hardware store we go to pick up some flexible PVC tubing, some vinyl mesh netting, short lengths of rebar and 4 large vinyl coated utility hooks.
 With the wood frame set up and the tubing hooped into the rebar that was inserted into the garden bed, we then affixed the mesh netting to the each end of the bed with tie wraps (the ends are permanently closed in) and then attaching the long side pieces of mesh to the top and letting it drape down over the side of the bed to the ground. There it was attached to another length of pvc pipe with tie wraps.
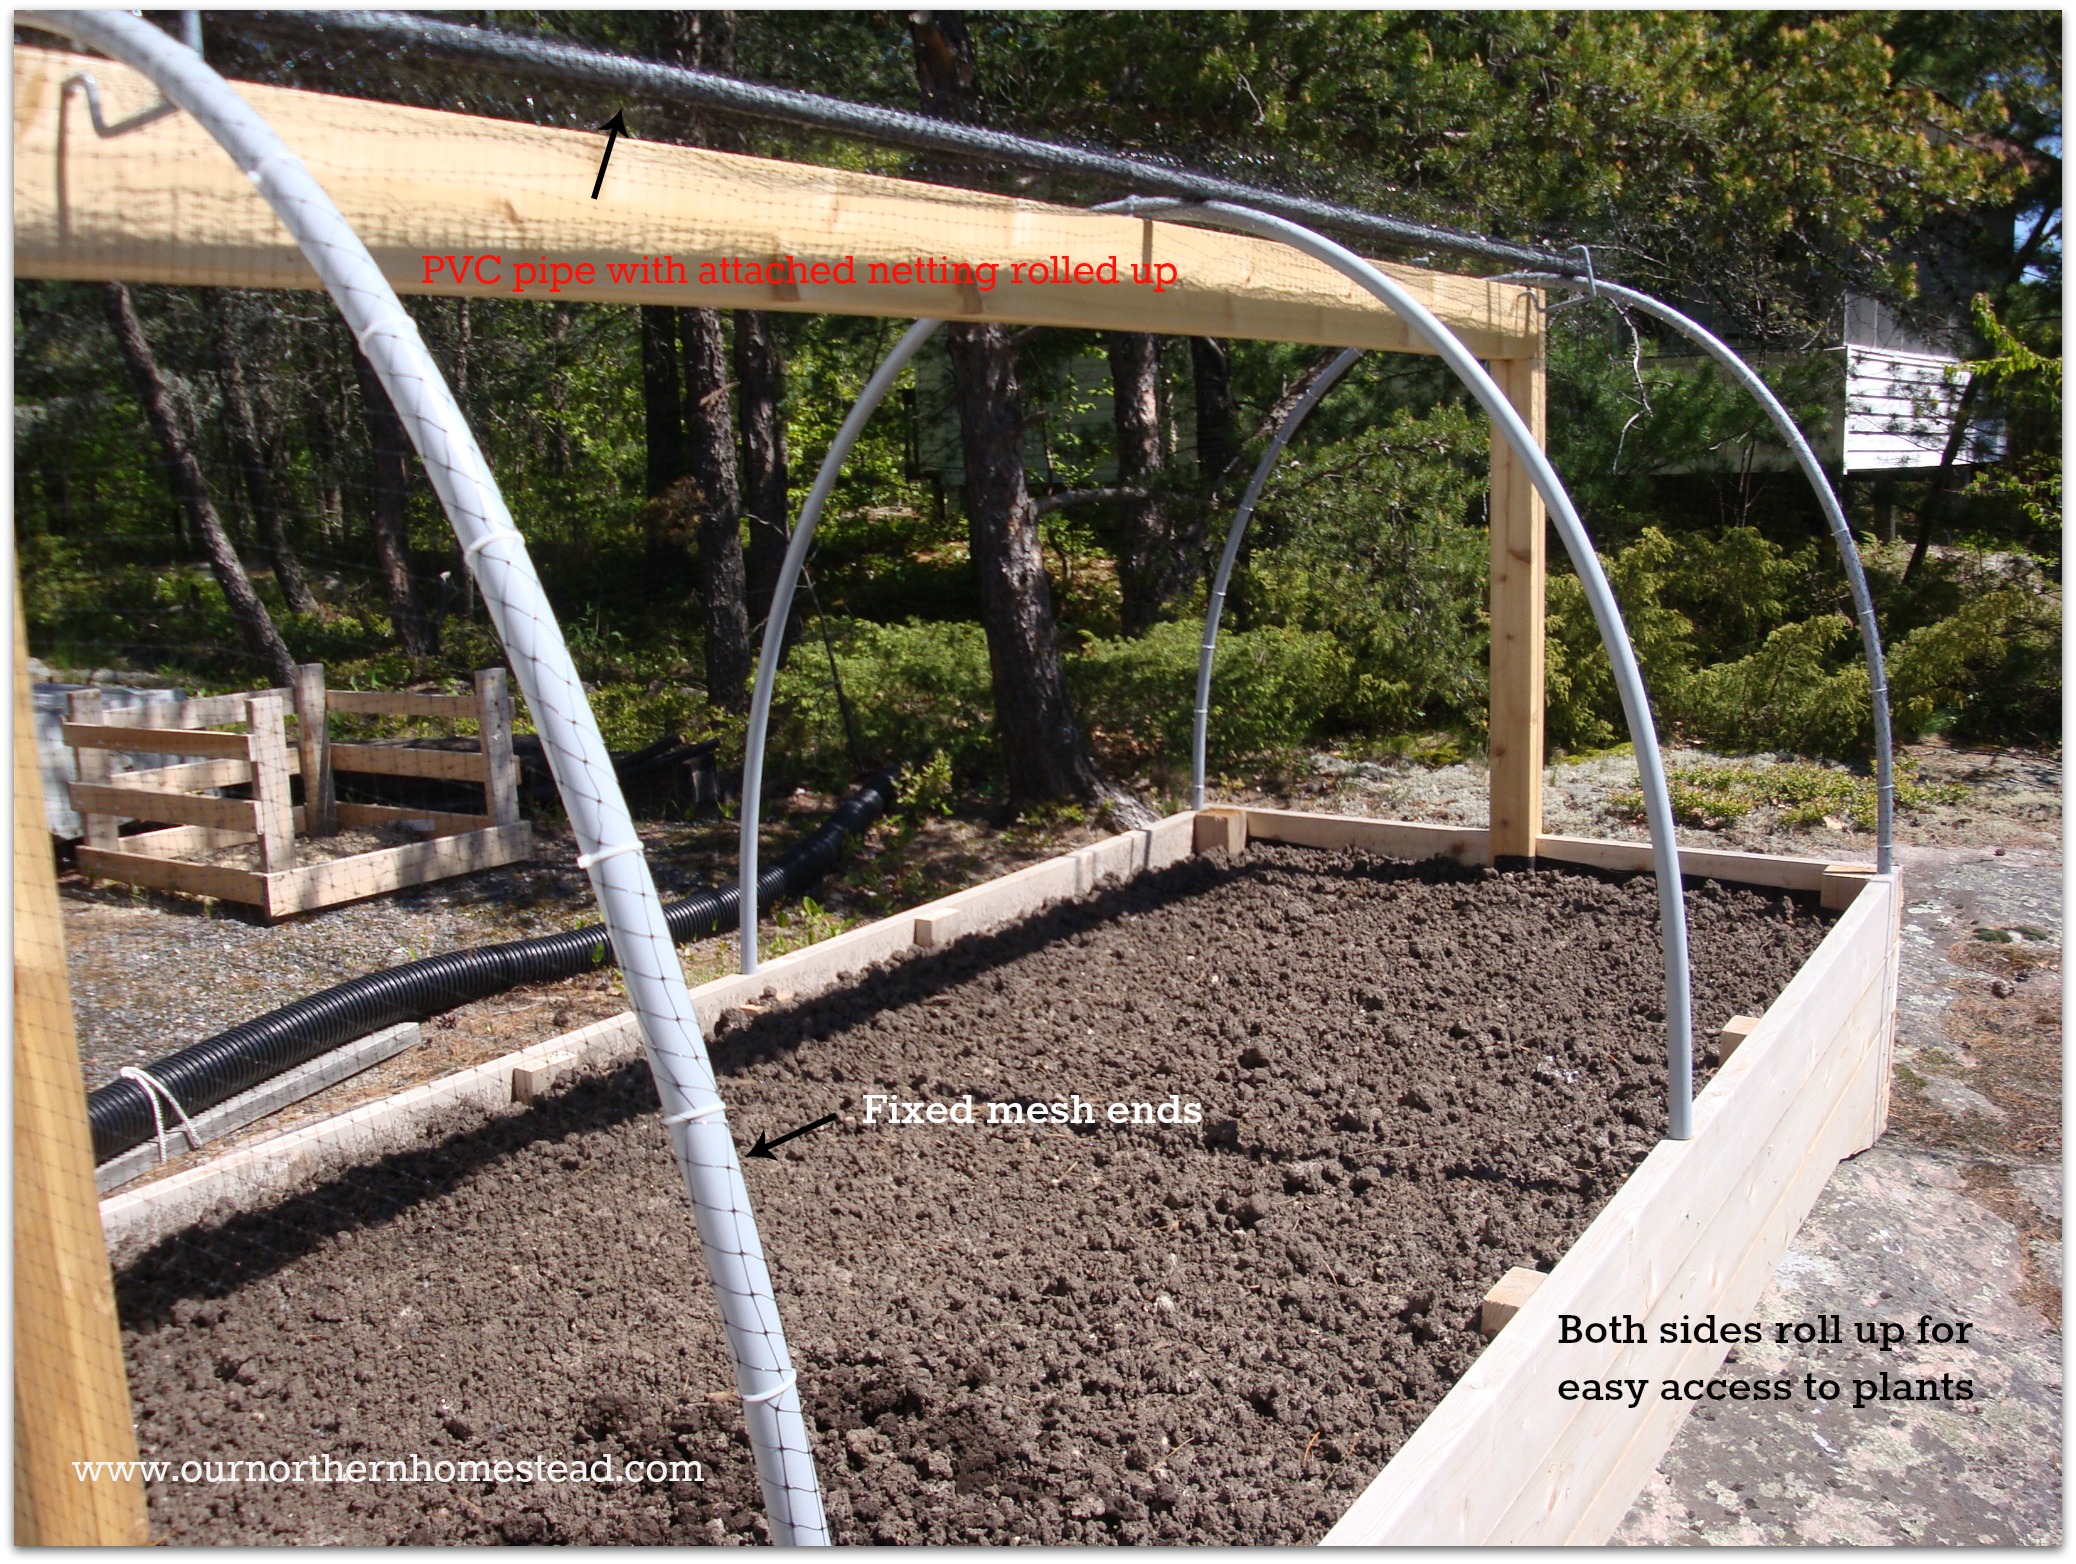 Then, when you need access, you just roll up the side of the netting and hang it on the hooks at the top. When you are done planting, weeding or picking your veggies, you roll the netting back down.
For a few hundred dollars in materials for the raised bed, dirt and protective cover, I hopefully have a critter proof garden bed…let the herd of Bambi’s head over to the neighbour’s place for a veggie buffet instead!
I have deer, too, that LOVE to munch my strawberries. I like your design, but I’m curious. Are the deer staying out? What keeps the edges of the long sides from flapping open?
The deer have not attempted to get into it. When you tie the mesh onto the side-ends (over those hoops), I used tie wraps to attach the mesh. Once you cut the tails off the tie wraps, make sure you leave about a millimiter of the tie end sticking out, then when you roll the sides down, pull the side edges over the tie wraps and the mesh will get caught on the tie wrap ends and hold it in place. You just need to unhook the side edges before you roll it up to access the gardens. Does this make sense?
Hi Deborah,
looks great but how did you attach the tubing into the cedar box on the ground? Thanks much Svenja
HI Svenja, hubby drilled a half inch hole in the side rail pieces and hammered in a 6″ length of rebar. The plastic conduit pipes then fit over the rebar thus holding them in. Feel free to ask any other questions if I am not clear 🙂
Just curious, what are the dimensions of your raised bed covered garden? Also, is it difficult to reach the plants in the middle of the bed? Thanks so much. I love the design!
Mimi
Hi Mimi!
My raised beds are 5′ x 10′ and I am vertically challenged (lol) and have no problem reaching the middle of the bed. Because they are located on sloping terrain, the depth ranges from about 10″ to about 16″ on them. Still plenty of soil depth for root veggies like carrots and parsnips.
Thank you for your kind comments and happy gardening! 🙂
Hi, this looks great! We have a wild rabbit issue on our land. I’ve got hoops already due to extremes of heat and frost, but wonder about the sides of your set-up. Do you grow things up the sides of your beds? Have you figured out a way to create trellis supports with this system?
Best, m
Hi Monika – oh wild rabbits and hares are a pita! We have the hares here, but with the mesh bird netting it keeps them out thankfully. I feel your pain though, had peas that were mowed down to nothing once
How thick are the cedar planks?
Hi Ronald! The cedar boards we used were 2×6 in size. 🙂
Hi, how did you build the frame over the raised bed? Did you use cedar or pressure treated lumber for that?
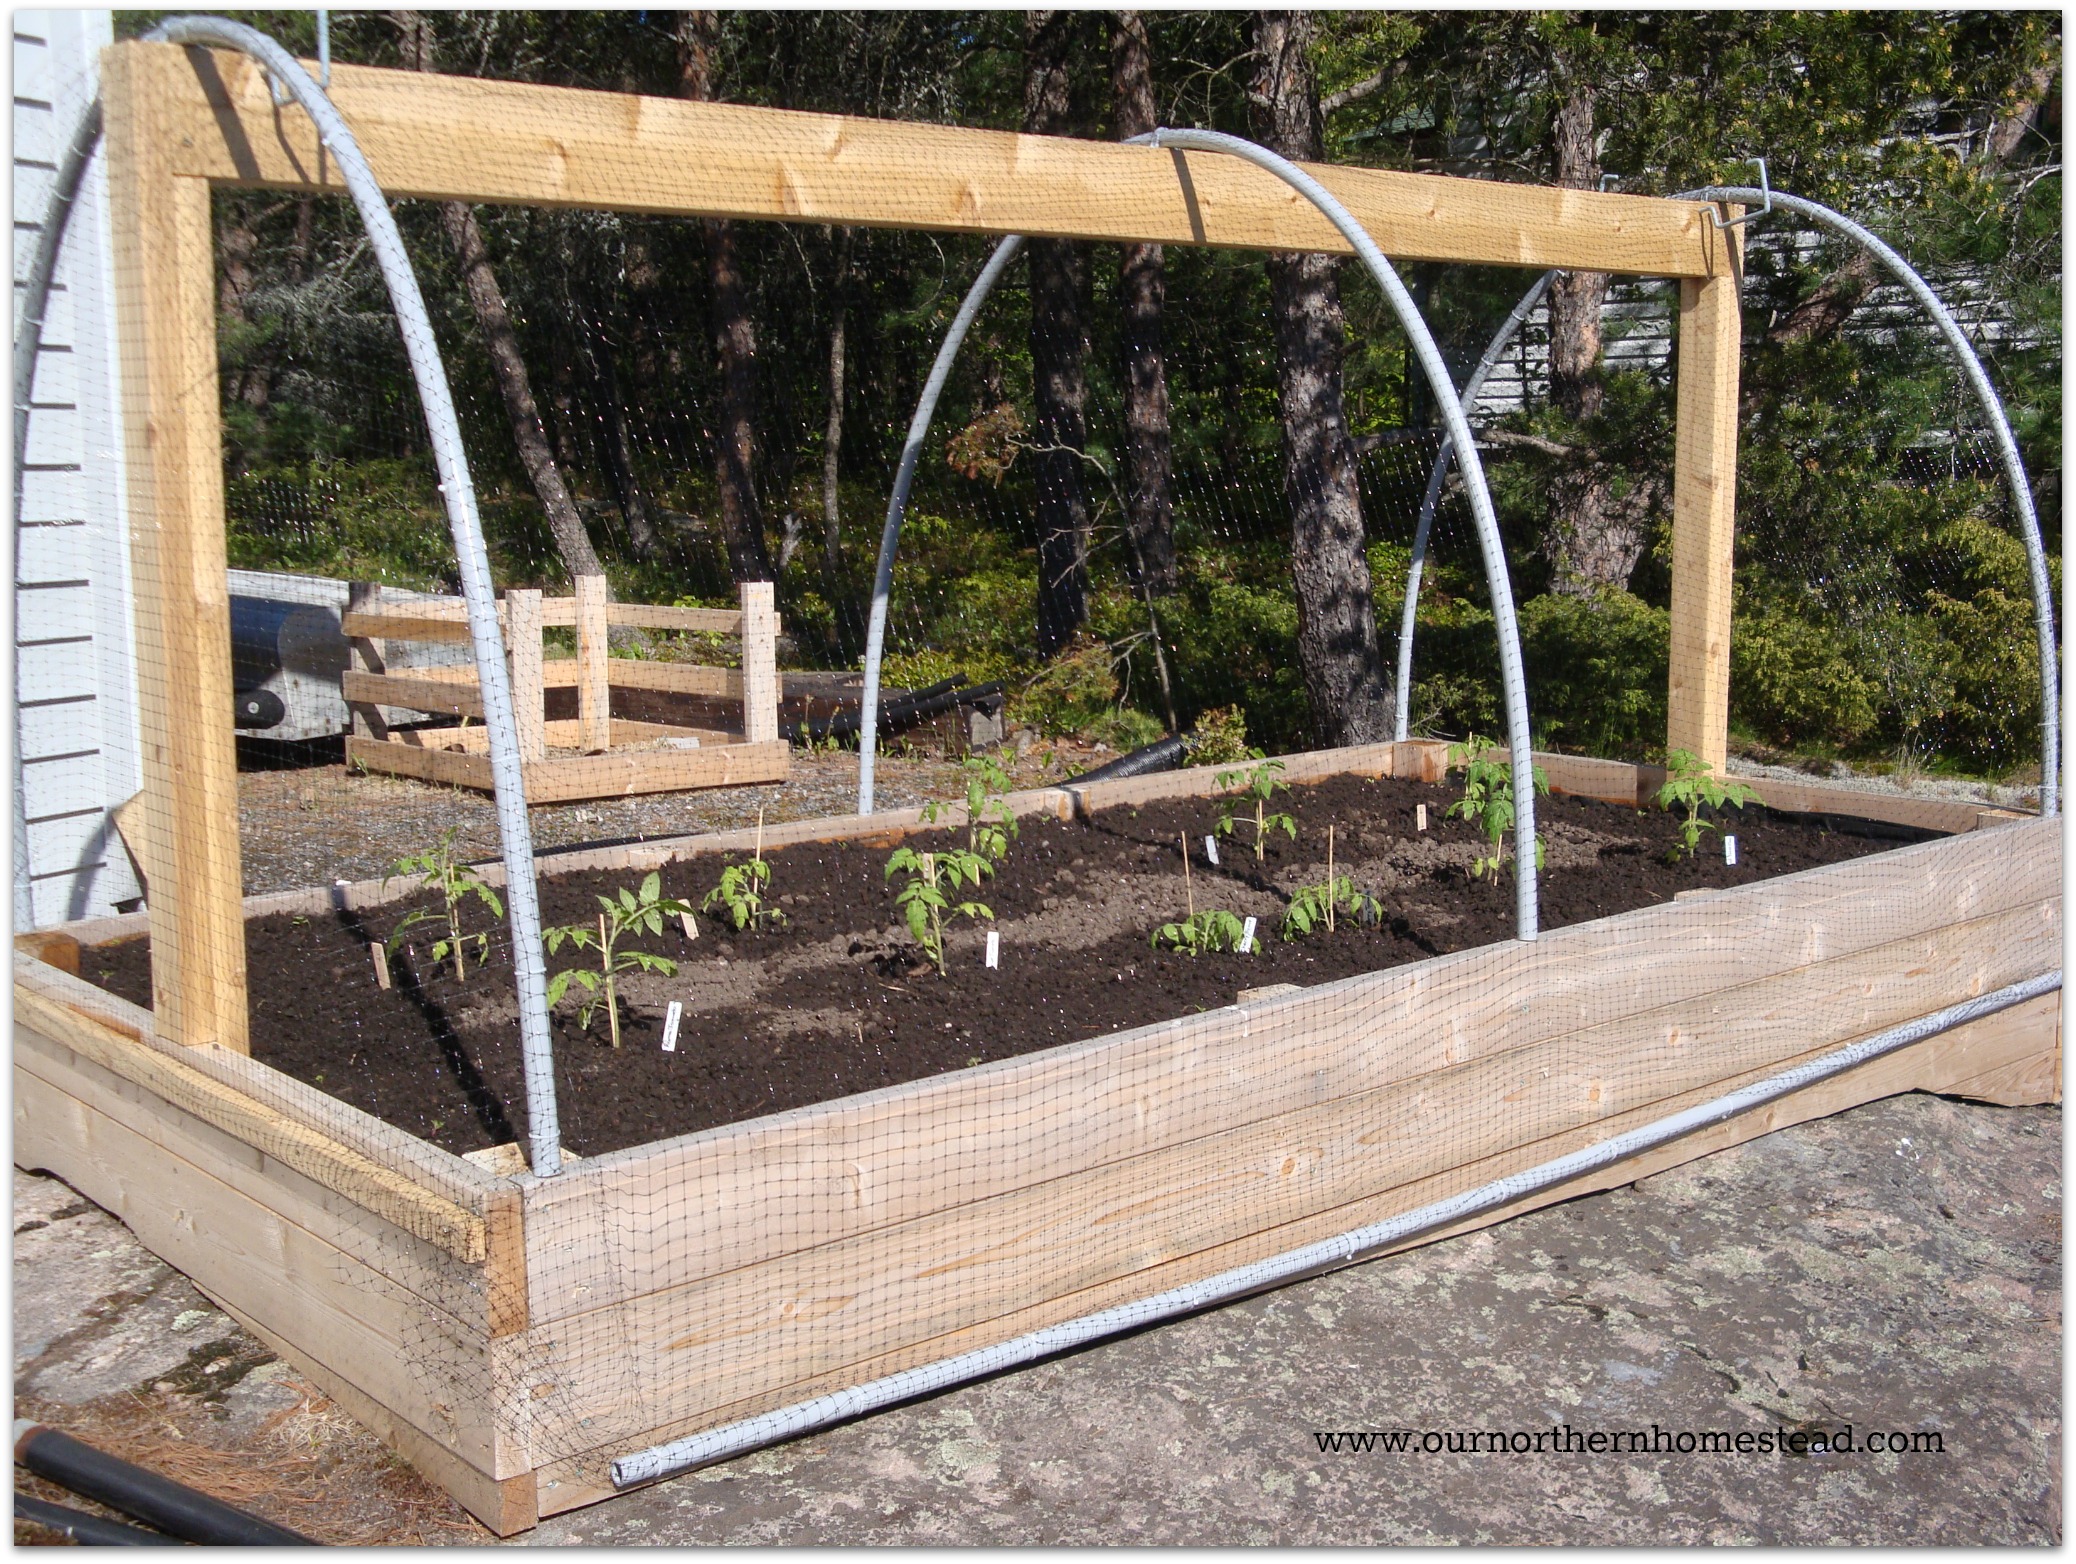
Hi! The entire garden bed is made of cedar, never use pressure treated for garden eds that will grow food vegetables/herbs as the chemicals from the pressure treated wood will leach into the soil. The upper part of the bed is simply 2×4’s up each end (in the middle of the span of the sides) and across the top connecting the 2 end pieces. From there, hubby used pvc electrical conduit as the “hoops” as they are flexible enough to be bent. He used 12″ long pieces of rebar in six locations (3 each side) and drilled holes for them in the top piece of 2×6 cedar on each side. The pvc electrical pipe then sits overtop of the rebar to hold it in place. From there, we just added the plastic and mesh to keep critters out. Hope this helps! 🙂
Thanks so much!
Hi there! How much did all of the materials cost?! Thanks! Looks great!!
Hello! All told if I recall correctly the materials were around a couple hundred. Make sure you use cedar and not pressure treated for veggie gardens 🙂
Thank you for this great plan. Our deer will decimate anything and the bird mesh is a game changer.
I’m curious as to what you grow in your bed. How many different types of plants to you have? We are in West Michigan so Zone 6.
Thank you,
Judy
Hi Judy! Thanks for your note. We are in zone 4A and I grow the following: Tomatoes, peppers (hot and mild varieties), beets, carrots, parsnips, radishes, various lettuces/chard/kale/spinach/arugula, leeks, green onions and herbs. As much as I can fit in! 😀 Happy growing season is almost here!
Hi,
I am planning a hugelkultur garden where a large amount of our yard was excavated. We have a huge pile of soil that I plan to move to employ materials in the hugelkultur manner. Our property has many trees so I hope to use them in the beds. Thank you so much for your information. I was going to build a large fence, but I think your method will be much easier, not to mention less obtrusive and less expensive! I will keep you posted. Thanks again!